


Introduction
Soft fruit commences cropping the year after planting. They are therefore, a particularly good investment. They are inexpensive to buy, produce good yields, do not require much space and are particularly valuable for small gardens.
Choice of Variety
All the varieties we offer are suitable for your garden and if given reasonable care will produce acceptable crops. Soft fruit do not require another variety for pollination, you can therefore restrict your choice to one variety.
Planting Distances
Blackcurrants, Redcurrants, Whitecurrants and Gooseberries: 5 feet apart x 5 feet between rows (on very good soil allow an extra foot between rows).
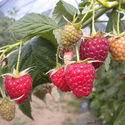
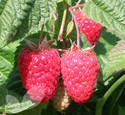
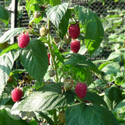
Raspberries (cane-fruit): 18 inches apart x 6 feet between rows.
Blackberries, Loganberries, Tayberries (cane-fruit): 10 feet between plants.
Grapes: 6 feet between plants.
Pruning and Training
1. Blackcurrants If planting between November – March ensure all shoots are cut down to 2 inches from soil surface immediately after planting. The year after this no pruning is required, but thereafter in subsequent years remove about a third of the old wood (darker in colour), cutting some shoots to soil level. If summer planting, prune between November and March as if newly planted.
2. Redcurrants, Whitecurrants and Gooseberries
The bushes have a short stem or ‘leg’ therefore remove any suckers from the root system. If planting is taking place from November – March prune immediately, shortening the leading shoots by about half their length. This will encourage the formation of a number of branch leaders. The branch leaders will be shortened by about a third the following winter this process being repeated every winter thereafter. Fruiting is encouraged by ‘spur’ pruning the newly produced young lateral growths or side shoots to 2 inches during July. Summer planted plants may be summer pruned although the branch leaders must not be pruned until the following winter.
3. Raspberries
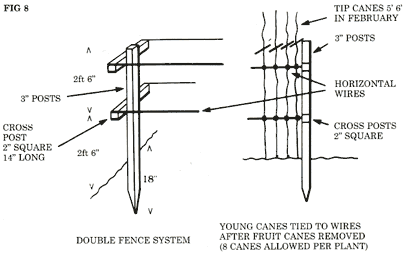
Cut the canes down to 9 inches above soil after planting. This 9 inch stub may be removed when the new shoots appear from beneath the soil. The young canes are later tied in 4 inches apart to a fence system for cropping the following year. There will be no crop during the first year except in the case of the Autumn-fruiting varieties which do crop the same year as the cane is produced. With all the varieties the canes which have fruited are cut down to ground level immediately after fruiting.
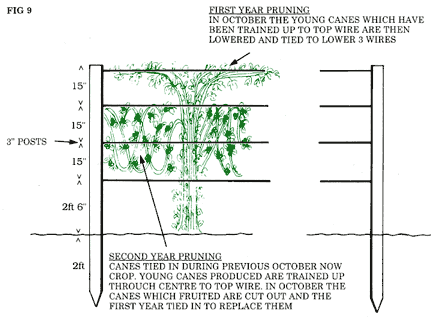
4. Blackberries, Loganberries and Tayberries
If planting takes place between November-March cut the shoots back to 9 inches immediately. From spring onwards tie the young shoots in as they grow, these will crop the following year. If summer planting takes place the young shoots produced may also be tied in, however if the shoots are weak cut them back the following winter and start again. Various training systems may be used, a simple method is illustrated below. Subsequent pruning is similar to raspberries. Canes which have fruited are completely cut out after fruiting.
5. Grapes
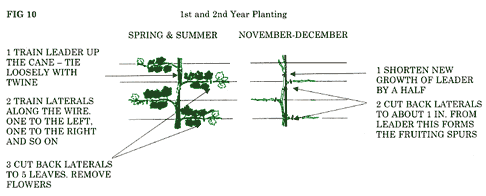
Grapes are usually trained on wires against a wall. Wires are placed horizontally at 1 foot apart. Plant grapes carefully with support. Trim main leader to 2 feet. Trim all side laterals to 1 bud. In Spring and summer tie laterals to wires to left and right of main stem and cut back to 5 leaves. For 2-3 years allow only 1 bunch of fruit per lateral. On mature vines allow 2 or 3 bunches per lateral.
Growing Grape Vines
The key is to spend some time on soil preparation before planting. The soil should be dug as far down as you can get incorporation lots of well rotted farm yard manure, its important that it should be well rotted because fresh manure will burn the vines roots. Another good source of organic matter is lead compost created from oak, ash and lime trees; beech leaves are best avoided, as they tend to be a little too acid for vines. Natural and well before the Romans took an interest in vines they grow naturally in woods and forests. Climbing trees in search of sunlight to ripen the fruit they produce, this is why the requirement for lots of organic matter in the soil to recreate the leaf litter found naturally on a forest floor is key to growing grapes successfully.
Most vines are supplied in pots. The same planting rules apply to vines as well as other pot grown plant, but with vines it is important that you –
- Make sure the root ball is not too root bound or has been grown in a small pot for to long so that the roots have started to spiral in the base of the pot.
- The planting depth should be just below the original compost surface in the pot so the root ball is just covered with soil.
Ideally the vine should be planted so that the roots are always kept cool and the head should be grown into the sun or towards a sunny spot on a wall or trellis etc. To keep the roots cool you can place large stones or rocks around the base to help shield the soil from direct sunlight.
In the first two years you should concentrate on forming a framework within the vine plant. This involves training the side branches and tying them to wires or trellis supports. The key points in this operation are not to tie the vine too firmly as the branches will expand over the next two years and the ties might constrain the branch to much and cause some damage. Secondary by training the side branched horizontally this will help encourage fruit production later. During the first two-year we recommend feeding with a liquid feed one a month through the summer to help create the frame work that will later support the grapes.
The vine will produce fruit in the first two years; this fruit is best left on the vine but thinned by removing 2/3rds of the grapes that have formed within each bunch.
Finally in the third year you can plan to produce some usable fruits. At the start of the year mulch with some well rotted farmyard manure around the base. You should no longer be feeding with liquid feed during the summer. The grapes will form again on the fruiting spurs and should be thinned in each bunch this time by one 1/3. They will develop over the summer then in late July you should remove some of the vines foliage around the grapes to allow the more sunlight to ripen the bunches.
At the end of the year you should tie in the new shoots cutting then back by 25% to encourage the formation of new fruiting spurs the following year. Finally tar washing with jeyes fluid in the winter has the advantage of killing all the pests that are over wintering in the stems and buds. This is carried out by mixing 1 part jeyes fluid to 30 parts water and spraying it on to the vine until it runs off soaking the stems and branches.
6. Goji Berries
Once established, goji berries are incredibly easy to grow. They’ll grow in almost any type of soil, and can even thrive in poor soil, as they are used to the mountainous regions in the Himalayas. They are reasonably drought-tolerant, and will even grow in partial shade (though you’ll get more berries from them if you grow them in full sun).
You can grow them from seed, or buy them as young plants. Buying young plants is far easier, as goji berry seeds are prone to rot in the compost and you’re less likely to get good results. The seedlings also need to be kept in warm conditions for 12 months, so for practical reasons, buying young plants is the more sensible option.
Once they’re a year old, however, they are perfectly winter hardy. Unchecked, they grow into a thick bush that reaches up to three metres tall, with vines that can grow to nearly four metres. If regularly pruned, they will form attractive small bushes that produce more berries as a result.
Growing
When your plants first arrive it is likely they will just look like bare twigs with some roots on. Don’t worry, this is normal. If planted straight away and watered well they will grow leaves within two-three weeks. Dig a hole around 50cm deep and wide and place the goji berry plant in it.
Firm the soil around the plant and water well. Leave about 1m between plants and mulch the area around the stems with leaf mould or garden compost to keep the soil moist and well nourished. You can even grow the bushes into a goji berry hedge; simply plant them 1m apart in a straight line.
Flowers
After two years the bushes will start to fruit, and from four years you’ll start to get very heavy yields. In early summer the bushes will produce small, delicate, trumpet-shaped flowers that will be either white or purple. Both coloured flowers can feature on one plant, so they provide visual interest before the berry production begins.
The berries will begin to set in autumn. The ripe fruit are sweet and juicy and almost shiny in appearance. The flowers will continue to bloom right up until the first frosts, however, so your plants will be red, white and purple throughout late summer and autumn.
They are beautiful to have in your garden, delicious, nutritious, and cheap and easy to grow. If you want health-boosting berries on tap you should consider investing in a goji berry bush or two.
7. Rhubarb
There can be few gardens without a clump or two of rhubarb, often tucked away in a corner and seldom giving of its best. Yet it is a crop that amply repays a little care and attention.
Establishing the Rhubarb Bed
A new rhubarb bed is best raised from divisions planted out in November, although it can be set out as late as March. Old crowns should be split, using a spade, into wedge shaped pieces with two or three buds on the outer edge, the inner part can usually be pared away with a knife (although old crowns are often hollow). Many growers, especially older ones, say that you should always leave the crowns on the surface to expose them to a hard frost before splitting them.
Rhubarb is not fussy as to soil but should be planted in slightly raised beds if the soil is very heavy. It does however need an open site, as it will not tolerate shade. Prepare the soil carefully by digging to two spits (spade depths), the roots go deep, and work in plenty of farmyard manure or compost as you go. In choosing a site remember that the leaves are heavy and reach at least 2 feet (60 cm) all round the crown. Set the divisions 21/2-3 ft (75-90 cm) apart with the buds at or just below the surface.
It is strongly recommended that you do not gather any sticks in the first year of a new rhubarb bed. The first good crop will come in the second or third year following planting.
Growing Rhubarb
Once you have established your plants the first basic principle of rhubarb growing is that plants should be kept dry in winter and moist in summer. A covering of leaves applied in October and removed in February will help in winter and a mulch of compost, leaf mould or farmyard manure applied in April will keep moisture in the soil during the summer. Always make sure, however, that the soil is thoroughly moist before applying this summer mulch. If in doubt, water well in dry seasons.
The second basic principle is to remember that rhubarb is essentially a leaf crop (no leaves, no stems) and that leaf crops need nitrogen. If you use farmyard manure for your summer mulch additional nitrogen will probably not be needed but a light dressing of nitrogenous fertiliser in March seldom goes amiss. Most of the rhubarb I see on the show-bench, or on allotments, shows signs of chronic starvation.
An established bed needs little attention beyond feeding and watering. The heavy foliage smothers most weeds. The only serious diseases are viruses which make the plant yellow and weak – these are incurable and affected plants should be destroyed. Slugs can be a problem – they seldom make serious attacks on the rhubarb itself, but use the rhubarb bed as a hotel from which to decimate other crops. You must, however, remove flower spikes as they appear and clear away dead leaves throughout summer and autumn.
A well-planted rhubarb bed will yield a satisfactory crop for ten or twelve years until the crowns get too many small buds. They should then be lifted, divided and replanted – leaving some crowns untouched to ensure continuity of supply.
Forcing Rhubarb
Rhubarb can be forced by lifting crowns in November and potting them up to be grown in the cellar, beneath the greenhouse staging or more simply by putting a bucket over the crowns in January.
Generally speaking rhubarb is best harvested for a period of four months from the time you take the first sticks. Three months if you have forced crowns.